This page provides an overview of the various actions that need to be taken within RootsMagic.
Initial Import into RootsMagic
Detailed instructions are given in the RootsMagic help, but this summary describes the key steps. From the RootsMagic main screen side panel select “File > Create a New RootsMagic file > Import from RootsMagic 1-7, GEDCOM, on another Program > GEDCOM”. Select “Browse for File” from the bottom of the main screen. Select your file, and RootsMagic will then prompt for the destination of the new RootsMagic file. Navigate to your required destination, and either enter a file name or accept the default name, which is the same as that of the GEDCOM file you are importing. Fill in other options (web hints, surname display, etc) according to your personal preferences. This will become your master database copy for subsequent updating and synchronisation with Ancestry.
Plugin Actions
In order to process your new RootsMagic database from Family Historian, you first need to link it to your project. This is shown in the “Links” frame at the top of the plugin menu, which is initially blank for a new file.

Click on the “Select” button to select the RootsMagic database file that you have just created.
The menu will update with the file name, which is now associated with the current project.
Click on “Compare Project with Linked RM File” to generate a Research Note listing all differences between the RootsMagic file and the corresponding data in Family Historian. As you have just created the new file, the only differences should be in the Living flags, where RootsMagic has set the values according to its own (undocumented) process.
Click on “Update Linked RM File” to push updated values to RootsMagic, which brings them in sync with Family Historian. A second Research Note is generated from the Update process, and should show no differences. Note that the database file should not be open within RootsMagic while running an Update operation. The plugin will remind you to ensure that the file is closed prior to proceeding with the update.
Uploading Tree to Ancestry
Once you have corrected the Living flags, re-open the RootsMagic database, and start the TreeShare process either by clicking directly on the Ancestry icon at the bottom of the side menu, or selecting Publish > Ancestry TreeShare.
Sign in to your Ancestry account, or create an account if you do not have one already.
Select “Upload to new Ancestry Tree”, and give the new tree a suitable name and description. Select whether the tree is public or private according to your preferences (it makes no difference to the upload and syncing process, or to hint generation). All other selections for optional content should be cleared, as the upload is just a bare tree without media or sources.
You now have a tree on Ancestry. Tree hints can be reviewed on the Ancestry website, in their Apple or Android apps, or within RootsMagic. There is no significant functional difference between these, so it is purely personal preference.
Importing Updated GEDCOM File to RootsMagic
As you progress with your Family Historian research, your project data file will gradually diverge from the original RootsMagic copy, as additional individuals or facts are entered or updates made.
RootsMagic has a “ShareMerge” function that is designed for exactly what we need to do here, namely update a RootsMagic database from a GEDCOM file.
The first step is to import the updated GEDCOM file into RootsMagic, which can be either another full export or a more selective update file. With your main RootsMagic database file open, select “File > Import Data > Import from RootsMagic 1-7, GEDCOM, or another Program > GEDCOM”. Select the updated GEDCOM file, either from the list of Found Files, or (more commonly), by selecting “Browse for File” and navigating to your file.
This imports the contents of the GEDCOM file into the current database, creating many duplicates, but this is resolved in the next step.
Select “People” from the RootsMagic side menu, then the Tools Icon, and “AutoMerge”.
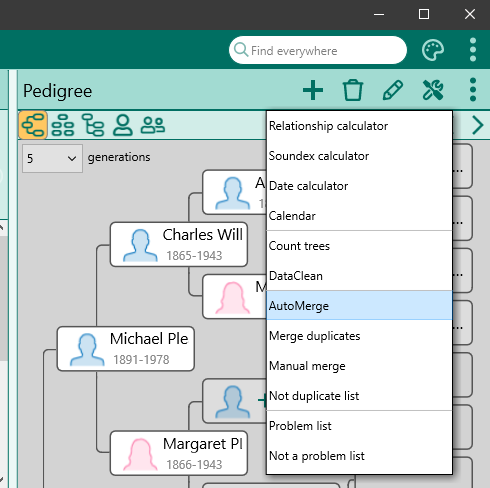
Select ShareMerge (not SmartMerge) from the options, as shown below.
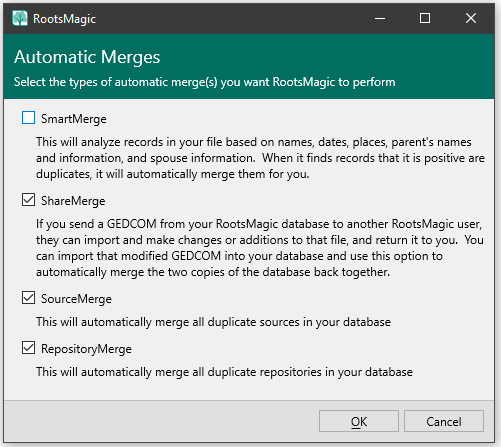
This merges Individuals based on UniqueID and removes the duplicated entries in the database and adds the new data (both Facts and family relationships) to update your file. Merging a full GEDCOM export file with a RootsMagic file stored on a mechanical hard disk can run rather slowly, as the program constantly writes updates to disk while merging rather than holding the process entirely in memory. However, with a more selective update file the operation is far quicker, as a much smaller number of updated records are written to disk, and additional benefit is gained if the RootsMagic file is stored on a fast SSD drive. Allow it to run to completion before continuing.
Unfortunately, this merging process is purely additive, and RootsMagic has no concept of which is the “master” version of the data. This means that the file now contains both new and old versions of updated Facts.
Updating RootsMagic via the plugin
This duplication of old and new facts is resolved by running the plugin a second time, and selecting “Update Linked RM File” from the menu. This will delete Facts from RootsMagic that are not in the Family Historian project, as well as resolving mismatches in data that arise as artefacts from the merging process. As the update step involves writing to the RootsMagic database, RootsMagic should be closed once the merging process is complete and before running the update step.
There are some records and fields that Family Historian plugins are not capable of modifying or deleting, due to proprietary formatting within RootsMagic, so the Update option generates a second Research Note listing remaining changes that it was not able to process, entitled “RootsMagic Update Guide”. This is usually limited to deleting Individuals or Family relationships and a limited set of fields such as names.
This Update process also synchronizes the “Date edited” field in RootMagic with the Family Historian Updated date for each individual, and marks the person as “changed” in TreeShare, greatly facilitating the selection of individuals to upload.
Final Changes to RootsMagic and Syncing with Ancestry
Use the output above to make any final changes to your RootsMagic file.
The final step of uploading your RootsMagic changes to Ancestry is relatively straight forward. Select “TreeShare for Ancestry…” from the Tools menu (or click on the toolbar button), and log on to your Ancestry account if required (there is a convenient “remember me” option to bypass this step). From there, simply work through the changes identified in the first Research Note and follow the menu prompts to update, add, or delete Individuals and Facts as necessary. Unfortunately, RootsMagic does not have an automatic synchronization process, and each modified person has to be processed individually. However, setting the TreeShare to display only changed individuals makes selection significantly easier.
When adding new individuals to Ancestry, family relationships are also copied automatically.
Plugin Ancestry Synchronization
Help content on this page is owned and provided by Mark Draper, the plugin's author, Calico Pie takes no responsibility for its content.